Gepetto : i never talk with that wierd l33t way of talking..it's such so wierd...
BasharOfTheAges : ya it is pretty easy to find a copy of adobe premiere pro, you see places to download it everywhere. well back when i used the premiere pro trial, i was following a guide that used Premiere 6.X, the basics were simple but after Adobe got rid of some things (motion settings,transparency settings) in premiere pro it was a little confusing.
A Newbie's Guide To Adobe Premiere
-
Up In Flamez
- Joined: Sun Apr 30, 2006 6:52 pm
- Location: Los Angeles
now after a page of grammar talk...on to the tutorial! 
2. Transparency and Speed
NOTE : A SIMPLE LOWERING OF THE OPACITY CANNOT BE DONE IN VIDEO TRACK 1 BECAUSE THERE IS NO VIDEO BELOW SO DON'T ASK WHERE THE OPACITY BUTTON IS!!
in sony vegas you can move the tracks in any order you want, in premiere you can't do that.
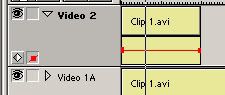
To lower the opacity of a clip, place it in video track 2 or higher and right click the little arrow on the track(make sure there is a clip below it or it will just look like a darkened clip).
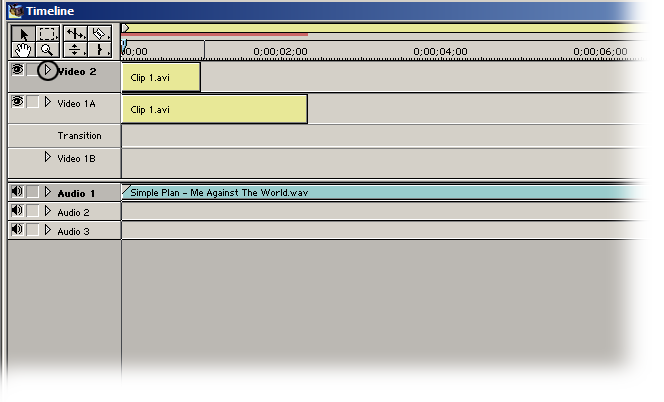
after you clicked the arrow grap the Fade Adjustment Tool and click on the red line and drag down. (TIP : HOLD DOWN THE SHIFT KEY TO SEE WHAT THE OPACITY PERCENTAGE IS)

one last that about transparency's, u you can play with other transparency settings by going to your 'Effects Control' pallette, remember the transparency settings won't be avaible in video track 1
Speed
To reverse a clip or make a clip speed up or speed down is very simple. Either right click your clip and select 'Speed' (this is for when you the clip length to be something precise)then type in the desired duration.
FOR MAKING A CLIP PLAY IN REVERSE, TYPE IN '-100' IN THE "RATE" SECTION

if you don't want a exact speed, then grab the 'Rate Stretch Tool' and grab the edge of a clip and drag it to your desired length.

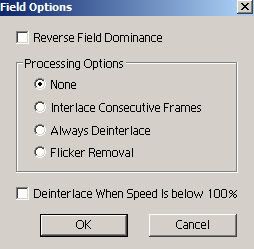
NOTE : WHENEVER YOU TRY TO SLOW DOWN A CLIP IN ADOBE PREMIERE 6.X, PREMIERE TRIES TO DEINTERLACE IT WITH A HORRIBLE METHOD. SO IF YOU SPEED UP A CLIP, RIGHT CLICK IT AND GO TO VIDEO OPTIONS > FIELD OPTIONS, AND UN-CLICK 'DEINTERLACE WHEN SPEED IS BELOW 100%'. IF YOU DON'T DO THIS, THEN YOUR CLIP WILL LOOK ALL JAGGED AND UGLY!!
The next tutorial will be on the following :
1. Video Effects
2. Transitions
3. Rendering
2. Transparency and Speed
NOTE : A SIMPLE LOWERING OF THE OPACITY CANNOT BE DONE IN VIDEO TRACK 1 BECAUSE THERE IS NO VIDEO BELOW SO DON'T ASK WHERE THE OPACITY BUTTON IS!!
in sony vegas you can move the tracks in any order you want, in premiere you can't do that.
To lower the opacity of a clip, place it in video track 2 or higher and right click the little arrow on the track(make sure there is a clip below it or it will just look like a darkened clip).
after you clicked the arrow grap the Fade Adjustment Tool and click on the red line and drag down. (TIP : HOLD DOWN THE SHIFT KEY TO SEE WHAT THE OPACITY PERCENTAGE IS)
one last that about transparency's, u you can play with other transparency settings by going to your 'Effects Control' pallette, remember the transparency settings won't be avaible in video track 1
Speed
To reverse a clip or make a clip speed up or speed down is very simple. Either right click your clip and select 'Speed' (this is for when you the clip length to be something precise)then type in the desired duration.
FOR MAKING A CLIP PLAY IN REVERSE, TYPE IN '-100' IN THE "RATE" SECTION
if you don't want a exact speed, then grab the 'Rate Stretch Tool' and grab the edge of a clip and drag it to your desired length.
NOTE : WHENEVER YOU TRY TO SLOW DOWN A CLIP IN ADOBE PREMIERE 6.X, PREMIERE TRIES TO DEINTERLACE IT WITH A HORRIBLE METHOD. SO IF YOU SPEED UP A CLIP, RIGHT CLICK IT AND GO TO VIDEO OPTIONS > FIELD OPTIONS, AND UN-CLICK 'DEINTERLACE WHEN SPEED IS BELOW 100%'. IF YOU DON'T DO THIS, THEN YOUR CLIP WILL LOOK ALL JAGGED AND UGLY!!
The next tutorial will be on the following :
1. Video Effects
2. Transitions
3. Rendering
-
Up In Flamez
- Joined: Sun Apr 30, 2006 6:52 pm
- Location: Los Angeles
3. Effects, Transitions, and Rendering
as you are reading this tutorial, you are probably wondering why you can't see your video effects and transitions. Premiere 6.X was made before computers were very powerful, so it's not a real-time editor like sony vegas or even windows movie maker.
Premiere 6.5 has a real-time preview but it's always good to render too.
What is rendering - rendering is when premiere makes preview files. (basically premiere exported your video so you can see it while working)
In premiere 6.0 you can use 'Preview from...either Screen/RAM\or disk. (disk is when premiere exports it) Preview from screen is previewing at low quality so that even a few fades might be a little laggy. Previewing from RAM is similar to After Effects, where premiere takes the segment you want and stores it in your RAM.
This is a unrendered timeline :
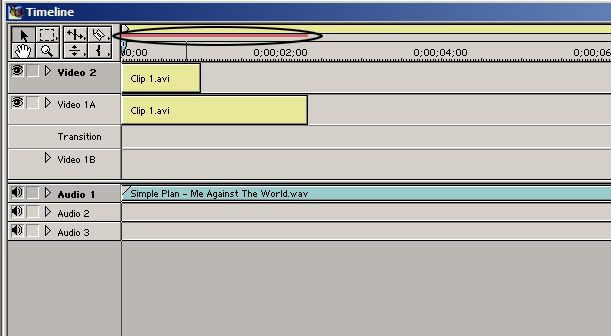
This is a rendered timeline :

the red indicates that it has not been rendered. and the green indicates that it is rendered.
TIP : MOST USERS OF PREMIERE 6.X USE THIS METHOD, ITS CALLED "SCRUBBING" where you hold down the 'Alt Key' and your arrow turns into a different shape(can't show a screen cap because 'Print Screen' doesn't show your mouse pointer) use this arrow and drag on the timeline. there will be no audio only the video. use this method for quick fades and stuff.
Effects :

Adobe Premiere has quite a few effects, now before you look through all of them like a kid in a candy store, rememeber that effects don't make the video. Also some effects in premiere are quite crappy.
To add a video effect, just click and drag on the timeline. Then the effect should appear in your 'Effect Controls' pallette. Adjust your settings to the way you want them.
TIP : A GOOD THING TO DO IS TO CLICK ON THE ARROW ON THE EFFECTS CONTROL AND CLICK "PREVIEW DURING ADJUST"
it's so you can watch the effect being adjust, very good for precise effect editing

then Alt scrub your timeline and see how your effect looks.
And to delete your effect, just click it in the effects control and click the trash icon in the window
Transitions :
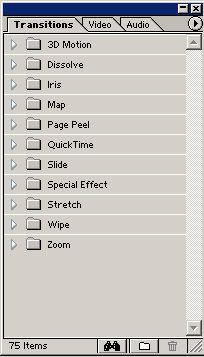
To add a transition, just like the video effects, click and drag onto the timeline.
To extend or shorten a transition, just hover your mouse over the edge of the transition and drag and resize to your desire.
To delete a transition, just click and press backspace or del or whatever.
Next Tutorial is on...umm i dunno...i'v gone over the basics
could someone suggest something? something else about premiere basics?
(i will not make a tutorial for someone asking how to do a certain effect)
as you are reading this tutorial, you are probably wondering why you can't see your video effects and transitions. Premiere 6.X was made before computers were very powerful, so it's not a real-time editor like sony vegas or even windows movie maker.
Premiere 6.5 has a real-time preview but it's always good to render too.
What is rendering - rendering is when premiere makes preview files. (basically premiere exported your video so you can see it while working)
In premiere 6.0 you can use 'Preview from...either Screen/RAM\or disk. (disk is when premiere exports it) Preview from screen is previewing at low quality so that even a few fades might be a little laggy. Previewing from RAM is similar to After Effects, where premiere takes the segment you want and stores it in your RAM.
This is a unrendered timeline :
This is a rendered timeline :
the red indicates that it has not been rendered. and the green indicates that it is rendered.
TIP : MOST USERS OF PREMIERE 6.X USE THIS METHOD, ITS CALLED "SCRUBBING" where you hold down the 'Alt Key' and your arrow turns into a different shape(can't show a screen cap because 'Print Screen' doesn't show your mouse pointer) use this arrow and drag on the timeline. there will be no audio only the video. use this method for quick fades and stuff.
Effects :
Adobe Premiere has quite a few effects, now before you look through all of them like a kid in a candy store, rememeber that effects don't make the video. Also some effects in premiere are quite crappy.
To add a video effect, just click and drag on the timeline. Then the effect should appear in your 'Effect Controls' pallette. Adjust your settings to the way you want them.
TIP : A GOOD THING TO DO IS TO CLICK ON THE ARROW ON THE EFFECTS CONTROL AND CLICK "PREVIEW DURING ADJUST"
it's so you can watch the effect being adjust, very good for precise effect editing
then Alt scrub your timeline and see how your effect looks.
And to delete your effect, just click it in the effects control and click the trash icon in the window
Transitions :
To add a transition, just like the video effects, click and drag onto the timeline.
To extend or shorten a transition, just hover your mouse over the edge of the transition and drag and resize to your desire.
To delete a transition, just click and press backspace or del or whatever.
Next Tutorial is on...umm i dunno...i'v gone over the basics
could someone suggest something? something else about premiere basics?
(i will not make a tutorial for someone asking how to do a certain effect)
-
Gepetto

- Mr. Poopy Pants
- Joined: Thu Jun 10, 2004 10:11 pm
- Status: Bored to tears
- Location: The Tokyo Settlement
- Contact:
Read your own name lately? Anyways, I was speaking to salemshady, the l33t and weird writing were just examples.uP|iN|fLaM3z wrote:Gepetto : i never talk with that wierd l33t way of talking..it's such so wierd...
And God spoke unto the Chicken, and He said: "Thou shalt crosseth the road", and the Chicken did cross the road, and there was much rejoicing.
My DeviantART profile
My DeviantART profile
-
CrackTheSky

- has trust issues
- Joined: Sun Aug 27, 2006 11:01 pm
- Status: Maybe editing?
- Location: Chicago
Might be a good idea to go over exportation. Also, if there's a pan/crop option in Premiere, might be a good idea to cover that. And masking, if it's not included in the pan/crop editor.uP|iN|fLaM3z wrote:could someone suggest something? something else about premiere basics?
(i will not make a tutorial for someone asking how to do a certain effect)

-
Up In Flamez
- Joined: Sun Apr 30, 2006 6:52 pm
- Location: Los Angeles
-
Gepetto
- Mr. Poopy Pants
- Joined: Thu Jun 10, 2004 10:11 pm
- Status: Bored to tears
- Location: The Tokyo Settlement
- Contact:
If it really bothers you, just find or start a name change request thread in the Site Help forum explaining what name you want and why. The admins can change it for you.uP|iN|fLaM3z wrote:ya my name... i made it in the 6th grade for counter-strike, i've been meaning to change it but the member name change service isnt here anymore
And God spoke unto the Chicken, and He said: "Thou shalt crosseth the road", and the Chicken did cross the road, and there was much rejoicing.
My DeviantART profile
My DeviantART profile
-
Up In Flamez
- Joined: Sun Apr 30, 2006 6:52 pm
- Location: Los Angeles
nah, my name doesn't really bother me that much, i might change it in the future but for now its fine.Gepetto wrote:If it really bothers you, just find or start a name change request thread in the Site Help forum explaining what name you want and why. The admins can change it for you.uP|iN|fLaM3z wrote:ya my name... i made it in the 6th grade for counter-strike, i've been meaning to change it but the member name change service isnt here anymore
also CrackTheSky, there isn't a pan/crop feature, it's an effect but it's not that important. Also you can't mask inside of premiere, you could maybe do some single frame masking for those who don't have After Effects or Photoshop
i guess i will show how to make a basic title and maybe single frame masking.
-
Pwolf

- Friendly Neighborhood Pwaffle
- Joined: Thu May 03, 2001 4:17 pm
- Location: Some where in California, I forgot :\
- Contact:
i didn't bother reading all the replies so if this was mentioned already, sorry
fyi: using the opacity rubberbands = better then using the crossfade transition itself... it gives you the same result. it also lets you do it on any layer (except 1) unlike crossfade with <i>only<i> lets you use layer 1. it's also faster to do. and easier to change later on.
Pwolf
fyi: using the opacity rubberbands = better then using the crossfade transition itself... it gives you the same result. it also lets you do it on any layer (except 1) unlike crossfade with <i>only<i> lets you use layer 1. it's also faster to do. and easier to change later on.
Pwolf
-
Up In Flamez
- Joined: Sun Apr 30, 2006 6:52 pm
- Location: Los Angeles
nah it hasn't been mentioned but i was thinking of mentioning it for a basic title fading in then outPwolf wrote:i didn't bother reading all the replies so if this was mentioned already, sorry
fyi: using the opacity rubberbands = better then using the crossfade transition itself... it gives you the same result. it also lets you do it on any layer (except 1) unlike crossfade with <i>only<i> lets you use layer 1. it's also faster to do. and easier to change later on.
Pwolf