Aspect Ratios and Frame Sizes for Online
Distribution
So, you have a progressive, filtered video -
preferably being processed in an avisynth script. You are almost ready
to compress this footage, all you have to do now is crop and resize.
There has been a lot of complicated discussion of frame sizes and
aspect ratios so far in this guide. With any luck you have worked out
things like anamorphic footage, square pixels vs dvd pixels and so on.
When producing for an online distribution there are a few things you
need to do:
1) You need to crop off any excess borders or junk
areas. These areas will only make compression more difficult if you try
and encode with them - this includes both letterboxing and video signal
noise at the top and bottom of the image.
2) You need to resize to a frame size that is a multiple of 16. This is
the most compatible with video encoders and decoders, so is highly
recommended.
3) You need to make sure you correctly compensate for anamorphic
footage.
4) You need to choose a resizer and a frame size that suits the amount
of compression you want to do.
These are all actually pretty straightforward, so let's go through them
one by one.
Cropping Off the Excess
Open up VirtualDubMod and load your avisynth script containing
your video. You'll get something that will look like this:
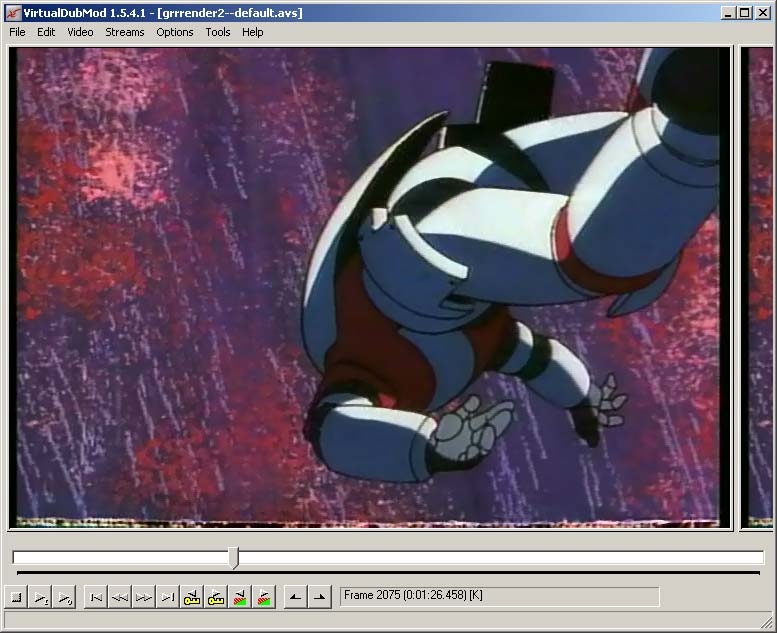
The excess in this video is mostly just the small amount of black
bordering at the edges of the video (this is normal) but you will
notice a little garbage at the bottom of the frame. This is an artefact
from old-school anime filming techniques that you can find at scene
changes.
So, for this particular video I want to crop from the left, right and
bottom edges. To do this in avisynth, a crop command like this is used:
Crop(left,top,-right,-bottom)
If you open up the avisynth script editor and add the following line to
the end, it will crop 8 pixels from the left and right:
Crop(8,0,-8,-0)
Remember to use negative values for 'right' and 'bottom' as positive
values will specify the final desired width and height of the frame.
Adjusting the crop can either be done by tinkering with the values,
pressing F5 and using trial and error until you get it right.
Alternatively you can use virtualdubmod's crop gui in the video >
filters section. Open up video > filters, add the "null transform"
filter and then click "cropping" for a gui. However, make sure you put
these values into avisynth instead of doing the cropping using
vdubmod's filters.
For the above video, I actually needed a crop of 8,0,-10,-12.
It is possible that your source has much more space to crop than the
above image. Some video footage mounts the image within borders on all
sides in order to compensate for tv overscan, then there are
letterboxed sources that will have a lot of border area to crop. Make
sure you crop so you are left with only the clean image afterwards but
be careful not to crop too much.
Working out Resizing Using the Resize Calculator
Now that you know your cropping values, you can resize. However,
because you've cropped, it is often difficult to know what to resize to
because of the complicated nature of aspect ratios. For this purpose
you need to use a good resize calculator... and it just so happens that
I made trythil write one.
The resize calculator is part of the AMVapp (Start Menu > AMVapp
> Support Tools) but it is also located here.
[The amvapp version allows you to copy the script to the clipboard so
it's best to use that version.]
There are a lot of options contained in the resize calculator but it's
not that complicated once you get used to it.
The first thing you will want to do is enter the video frame size. This
will be the frame size (resolution) you exported your video at. 720x480
is common for NTSC but you might be using something else. You then
choose a frame size preset. If you were editing at dvd PAR then
choose "NTSC DVD" or "PAL DVD". If you were editing with a
square pixel PAR then choose "Computer square pixels".
Once you have the correct frame size preset, you can then choose what
kind of resizing you are doing by choosing a pixel aspect preset. As we
are resizing for online distribution our target par is 1:1. If you are
using regular dvd 4:3 footage then choose NTSC/PAL 4:3 onto VGA 1:1.
If you edited using an anamorphic footage source choose 16:9
to VGA 1:1. For square pixels sources you should choose 1:1 to 1:1.
The final thing to do before calculating is to add your cropping
values. You will notice that if you chose a DVD profile and you are
resizing to 1:1, the calculator will automatically start you off with 8
pixel cropping on left and right. This is required to keep aspect ratio
with official video specifications so keeping this is recommended even
if you don't think you need any cropping. You can disable this by using
the Custom frame preset.
So, with all the options set up and the crop values added, press Calculate.
You can now use the slider to calculate a whole variety of frame sizes
based on the settings you have chosen. By default the frame sizes will
be multiples of 16, which is ideal for distribution codecs. Now,
exactly which frame size you choose will depend on a variety of things.
First of all there is the error margin (error %) as shown above. Some
resizing will not have a perfect aspect ratio. It just so happens that
with my crop settings and this frame size that there is no error and
the image is resized to the perfect aspect ratio. Small errors of 1 or
2 percent aren't really that much of a problem. If you want to reduce
errors, you can have the resize calculator automatically add a few
pixels to your cropping in order to have a more accurate aspect ratio.
To do this, select the "Crop" tab and choose "Auto-adjust
crop". Now when you calculate, the crop will be added to if it
makes a better aspect ratio for a certain frame size.
The second thing is the frame size itself - how big should you resize
to? Well there are all sorts of possibilities but a general rule of
thumb is as follows: The larger the frame size, the bigger the final
encode will need to be to be good quality and the slower it will play
on some machines. Of course, very small frame sizes will always be low
quality so you need to decide a good balance for you. Here are some
guidelines.
Width of ~640 pixels: If you want a very high
quality encode and don't worry about file size or playback speed then
having a frame size of around 640x will be ideal. The most simple
resize is from full screen dvd, cropping 8 pixels form left and right
and resizing to 640x.
Width of ~512 pixels: This is still a high quality frame
size but it can help a great deal if you have a source that is hard to
compress.
Width of ~412 to 480 pixels: The is
medium quality but will be easier to compress so if you need a small
size it will compress better with a small frame size like this.
Width of ~320 pixels: This is the
absolute minimum you should resize down to. It will look... ok, but
will never look great.
So, you should move the frame size slider until you get your desired
width. Looking for frame sizes near to your desired width with a small
error margin is a useful thing to do.
Choosing a Resize Type
There are a number of different algorithms in avisynth that can be used
for resizing footage. The resize calculator is designed to produce the
avisynth commands for you so you can specify a resizer in the "Resizer"
tab. These resizers all refer to avisynth resize functions
available with the amvapp:
LanczosResize(width,height) - this is the standard sharp
resizer for high quality encodes. I use this resizer pretty much all of
the time as it gives, in my mind, the most appealing image even though
it may be harder to compress than other resizers.
BiLinearResize(width,height) - this is a resizer that
does a lot of smoothing. This is great if you want to make your source
more compressible but it smooths a little too much for me.
BiCubicResize(width,height) - another sharp resizer,
very good quality. Not as hard to compress as Lanczos.
PointResize(width,height)
- also known as nearest neighbour. YOU SHOULD NEVER USE THIS unless you
want to make your footage intentionally blocky.
HybridFuPP(width,height) -
an experimental resizer that resizes different parts of the image in
different ways depending on how noticeable they are to the human eye.
This also does some filtering on your source in different areas and is
designed as a general all-round package for gaining good visual quality
and compressibility at the same time. This will be slow :)
SharpResize(width,height) -
insanely sharp and insanely hard to compress. Has its uses, just not
for online distribution.
So, as you can see, the resizer you choose can help you gain better
compressibility. Generally I tend to use a high quality resizer and
just try and gain better compressibility through filtering but you can
do both.
Pedantic Resizing
There is an option in the calculator to use pedantic resizing
calculations. This is as close to official video specs as we can find
but it's actually more accurate than most of the industry care to use,
so really it's not that important. I don't use it, it's only for the
really anal - the difference is very minor.
Copying the Settings to Clipboard
Once you have everything set up and the calculation is what
you are looking for, you can choose the "Make Avisynth Script" which
(if it has permission on your computer) will copy the commands to the
clipboard. If it cant, a window with a text dump of the commands will
appear. My commands, when generated were as follows:
Crop(8, 0, -10, -12)
LanczosResize(480, 352)
I already had the crop command in my script, so I just pasted over the
old one.
Finalising Your Settings
By this point you might have a pretty complicated avisynth
script. You should test it out in VirtualDubMod and see if it looks
good. If you are worried about your resize settings being off, you can
always compare the image you see to the image you get when you play the
footage from dvd using a PC player like WinDVD.
Now that you have cropped and resized, you are ready to compress your
video.
AbsoluteDestiny - September 2004
|