|
Getting Started Tutorial This tutorial is a quick guide to learning After Effects. This is only the tip of the iceberg of what you can do with AE. Getting started is always the hardest part, which is why I've decided to write this tutorial. To go any further than the basics however, would be to simply regurgitate a ton of information that's already available. After you have learned the basics here, I present some ways to further your learning on the next page. This tutorial will cover the following material:
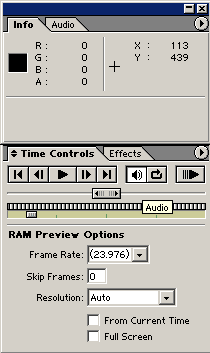
First off, the biggest mistake people make when learning AE is they try to think of it in terms of their video editor (ie. Adobe Premiere). AE is NOTHING like Premiere! While learning AE, it's good to put Premiere completely out of your mind! While learning AE, the best thing to do is just play around in it. You'd be surprised at just how much you can learn this way. Another good thing you can do is refer to the manual or help file if you can't figure out how to do something. With that said, let's get started! When you start up AE, you will probably have a blank screen except for a few windows which probably make no sense to you. On your left you should see a window titled "Untitled Project.aep". This window contains all of your footage that you can use in your project. The first thing we want to do is create something called a composition. A composition is basically a timeline that contains items such as your footage. You can have more than one composition in your project and you can even lay compositions down inside of other compositions. To create a new composition, right-click in the footage window and select New Composition. At this point a window will appear where you can specify various video settings such as resolution and framerate. If you don't know what those are, then I think you better stop reading this guide right now. ^_^; The Duration value in the composition settings is especially important. This sets the length that your composition will be. In Premiere, the timeline will grow and shrink dynamically as you add or delete footage from it. In AE however, compositions are a fixed size. If you don't know how long your composition will need to be, don't worry about it. You can always change the length of it later by going to Composition > Composition Settings. After you fill in the info for the composition, and hit OK, a number of things will occur: A timeline will appear at the bottom of your screen, a video window will appear in the top center of the screen, and you will notice that a composition item has been added into the footage window. Let's take a moment to look at the timeline now. To save space I've cut off the left side of it in the image below. 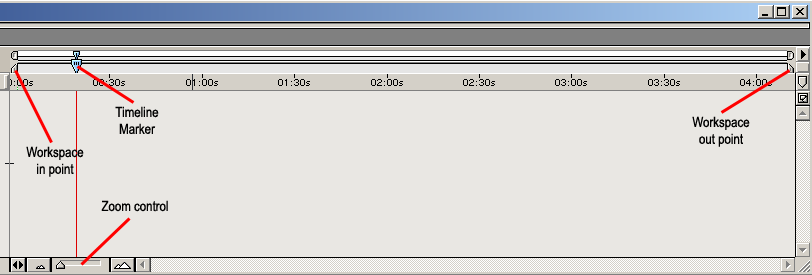 First thing to notice is the timeline marker. This works the same in Premiere or any other editing program. You drag it left or right to view any part of your timeline you want. Next we have the zoom controls. You can zoom in and out either by dragging the slider left or right, or by pressing the buttons on the side of the slider. Finally, we have the workspace In/Out points. You need to become acquainted with these 2 markers because you will be moving them around A LOT. You can adjust these either by dragging them, or by moving the timeline marker to where you want it to go then pressing the "B" or "N" key on your keyboard. B sets the In point and N sets the Out point. The space between these two points is your work area. If you want to preview the part of your video that is in the work area, simply press the "0" key. When you preview, it will render all of the frames in the work area and then play them back at normal speed. This is very important for fine-tuning your work. When setting the size of your work area, you should keep it small. AE renders the frames into your RAM when you preview, making the amount of video you can preview at a given time limited to the amount of ram you have. If you try to preview a section that is too large, AE will render as much as it can and then play only that section.
Next, drag your image onto the timeline. Pull your timeline marker back to the very beginning of the composition, making sure the image is at that position. On the left of the image's layer there should be a purple box with a arrow beside it. Click on the arrow to expand the layer properties. You'll notice that the only thing listed there is Transform. This has an arrow beside it too. Click this arrow to expand the transform properties. We want to make the image fade in over the first second of the video. We will do this by keyframing the opacity value of the image. With the timeline at the beginning of the composition, click the stopwatch icon beside opacity. This tells AE that we want to animate this value. A keyframe will automatically be set at the current frame. We want the image to fade in, so change the opacity value to zero. Then move the timeline marker over about one second, and change the opacity value to 100. Another keyframe will be automatically set when you change the value. Press 0 to preview and see the image fade in. 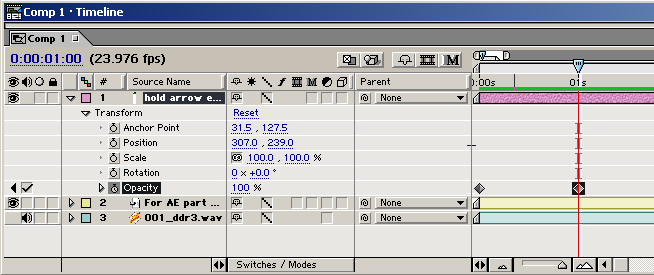 Now, lets make the image spin out into the screen on the beat of the music. First, we need to find a beat to start the animation on. If you hold down Ctrl as you slowly drag the timeline across the composition, you will hear bits of the audio. It's not very clear, but you should be able to make out the beats. You can also expand the audio track to display the waveform by clicking the arrow on the left of the audio layer, clicking the arrow beside "audio", and finally clicking the arrow beside "waveform". Position your timeline marker at one of the beats. Now, click the stopwatch icons beside position, scale and rotate. Move the timeline forward about half a second or a second and change the value of rotate to 180 degrees then set scale large enough that the image nearly completely covers the video window. Finally, adjust the position so that the image is just barely off-screen. Now try previewing the animation by pressing 0. It probably doesn't look impressive, but it's a start. How about adding some motion blur to it? First, we need to enable motion blur within the composition. There is a row of icons across the top of the timeline, the last one being an "M". Clicking this allows motion blur to be used. Now, we want to apply motion blur to the image. On the image's layer, there are a row of checkboxes. Put a check in the one with an "M" on it. Now motion blur is enabled on the image. Preview the video again, and note the difference in how it looks. 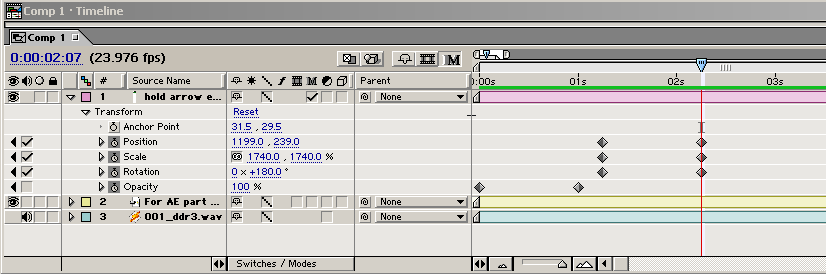 For the last part of the tutorial, let's apply an effect to the video layer. Select the video layer by clicking on it. Now right click it and go to Effect > Distort > Bulge. An effect controls window will appear. We wont be needing this window, so you can just close it. Then go and expand the layer properties for the video layer. After applying the effect you will notice that instead of just transform, effects is also listed. Expand the effects properties and then expand the Bulge properties. Set the horizontal and vertical radius to half the width and height of your video. Click the stopwatch on bulge height and bulge center to set keyframes. Move forward about a second on the timeline and change the values of the center width and height. Change them to any values you want. Preview and see how the bulge animates. Go and add more effects if you want, It's fun! Finally, let's render an avi file of our work. Adjust the in and out points of the workspace to cover the entire section you would like to render. Now go to Composition > Make Movie. For the render settings option, click the arrow that's pointing down and select "best settings". Under output module, click on "lossless" to bring up the output settings. Here, click "format options" to select a codec to use. If you would like audio to be included in the output file make sure to check the "audio output" box at the bottom. Finally, click by output to to select the filename you wish to save as. Now hit the render button and wait. This concludes the tutorial. While we didn't create anything very cool, I hope this has allowed you to get a firm grasp on the basics. If you are interested in learning some more advanced topics on your own, please check out the next page. On to part 2: Furthering Your Knowledge of After Effects |