Hydrax : by on one page, i assume you mean a website? sorry, i am not good with websites
sliceman : you can't post asking about that. If you really want it for free just go to adobe.com and download the trial version, so it's free for 30 days!
A Newbie's Guide To Adobe Premiere
-
Gepetto

- Mr. Poopy Pants
- Joined: Thu Jun 10, 2004 10:11 pm
- Status: Bored to tears
- Location: The Tokyo Settlement
- Contact:
Very detailed. I'm impressed.
And God spoke unto the Chicken, and He said: "Thou shalt crosseth the road", and the Chicken did cross the road, and there was much rejoicing.
My DeviantART profile
My DeviantART profile
-
Gepetto
- Mr. Poopy Pants
- Joined: Thu Jun 10, 2004 10:11 pm
- Status: Bored to tears
- Location: The Tokyo Settlement
- Contact:
Alright quit breaking the law and making hard-working people lose their jobs just because you're a lazy dishonest prick.sliceman wrote:Alrigth take it easy.
Better?
And God spoke unto the Chicken, and He said: "Thou shalt crosseth the road", and the Chicken did cross the road, and there was much rejoicing.
My DeviantART profile
My DeviantART profile
-
Up In Flamez
- Joined: Sun Apr 30, 2006 6:52 pm
- Location: Los Angeles
Miscellaneous
this section's purpose is for correcting some mistakes i made in my other sections. And i might throw in that 'Masking tutorial'
Rendering :
Here are some stupid mistakes i made
If you are in 6.5 and have 'Real Time Preview' enabled, just press 'Enter' to preview. If you don't have it enabled or if you are in 6.0 pressing enter will render it for you.
That is one way to render, but for those who have 'Real Time Preview' or the other 6.0 settings, go to Timeline > Render Work Area
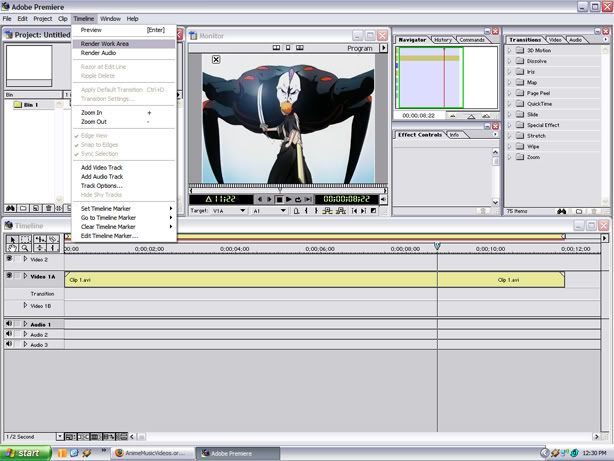
(TIP : ONLY RENDER AREAS WHERE IT IS RED, ALSO DOUBLE CLICK ON THE WORK AREA MARKER AND IT WILL AUTOMATICALLY FILL IN THE SPACE OF YOUR CURRENT TIMELINE) if you still don't know what i mean, look at the pictures.
Notice that the work area marker, isn't around the area i want it to render.
Here i double-clicked on the work area marker, and it automatically fitted it self in the timeline
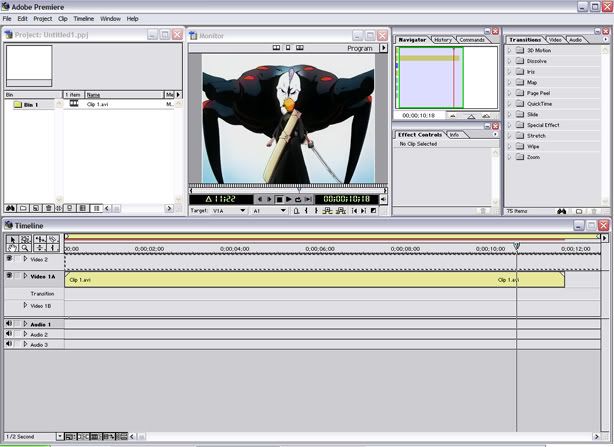
also you can grab the edges and drag it until it is the size you want. (like trimming a clip)
Fading :
Also i said you can make a simple fade with 'Cross Dissolve'. you are probably confused on how make something fade out and then fade back in or vice versa with only one 'Cross Dissolve'.
This can only be done in A/B editing.
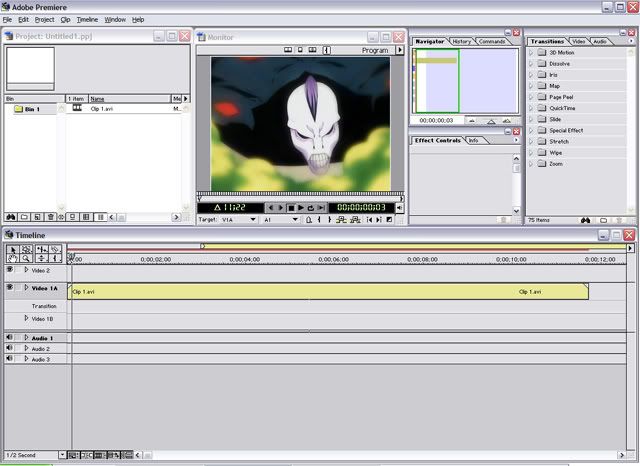
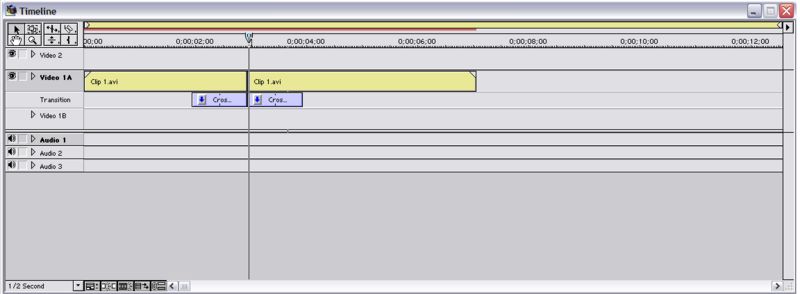
First drag your clip that you want to fade out, then grab the clip that you want it to fade into.
Place them side by in Video Track 1A like here :
then grab the 'Cross Dissolve' transition in your transitions folder
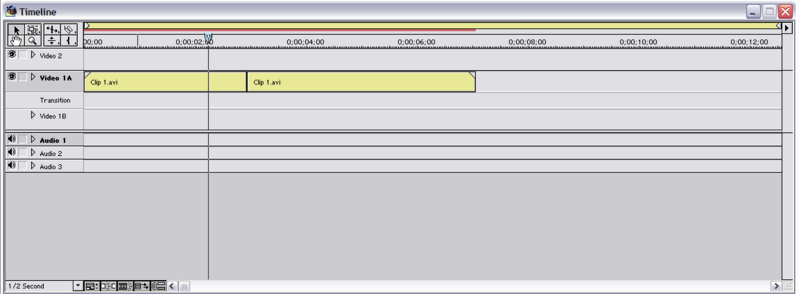
Grab one and place it on the transition track anywhere you want then grab another 'Cross Dissolve' transition and place it on the transition track.
The place them together to match the video.
if you alt + scrub that, you will see the video fade out and then show your second clip and then fade out again. This isn't what we wanted, We want it to fade out then fade in. To do this, press the little arrow on the transition.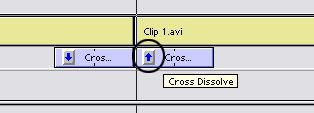
This will reverse the transition making it fade in not out. So now if you alt + scrub, it should fade out then fade back in.
NOTE : THAT USING RUBBERBANDS ARE HIGHLY RECOMMENDED, THEY ARE MUCH BETTER THAN USING CROSS DISSOLVES'
That's the end of this part, if i have the time i will do that 'Masking' tutorial
this section's purpose is for correcting some mistakes i made in my other sections. And i might throw in that 'Masking tutorial'
Rendering :
Here are some stupid mistakes i made
If you are in 6.5 and have 'Real Time Preview' enabled, just press 'Enter' to preview. If you don't have it enabled or if you are in 6.0 pressing enter will render it for you.
That is one way to render, but for those who have 'Real Time Preview' or the other 6.0 settings, go to Timeline > Render Work Area
(TIP : ONLY RENDER AREAS WHERE IT IS RED, ALSO DOUBLE CLICK ON THE WORK AREA MARKER AND IT WILL AUTOMATICALLY FILL IN THE SPACE OF YOUR CURRENT TIMELINE) if you still don't know what i mean, look at the pictures.
Notice that the work area marker, isn't around the area i want it to render.
Here i double-clicked on the work area marker, and it automatically fitted it self in the timeline
also you can grab the edges and drag it until it is the size you want. (like trimming a clip)
Fading :
Also i said you can make a simple fade with 'Cross Dissolve'. you are probably confused on how make something fade out and then fade back in or vice versa with only one 'Cross Dissolve'.
This can only be done in A/B editing.
First drag your clip that you want to fade out, then grab the clip that you want it to fade into.
Place them side by in Video Track 1A like here :
then grab the 'Cross Dissolve' transition in your transitions folder
Grab one and place it on the transition track anywhere you want then grab another 'Cross Dissolve' transition and place it on the transition track.
The place them together to match the video.
if you alt + scrub that, you will see the video fade out and then show your second clip and then fade out again. This isn't what we wanted, We want it to fade out then fade in. To do this, press the little arrow on the transition.
This will reverse the transition making it fade in not out. So now if you alt + scrub, it should fade out then fade back in.
NOTE : THAT USING RUBBERBANDS ARE HIGHLY RECOMMENDED, THEY ARE MUCH BETTER THAN USING CROSS DISSOLVES'
That's the end of this part, if i have the time i will do that 'Masking' tutorial
-
Up In Flamez
- Joined: Sun Apr 30, 2006 6:52 pm
- Location: Los Angeles
-
Gepetto
- Mr. Poopy Pants
- Joined: Thu Jun 10, 2004 10:11 pm
- Status: Bored to tears
- Location: The Tokyo Settlement
- Contact:
Every video clip or image has an opacity control lready applied when you put it in the timeline. Go to the "Effect Controls" tab and it should be right under "Motion".Leo#87 wrote:Can someone tell me where the opacity editing stuff is in premiere pro?
And God spoke unto the Chicken, and He said: "Thou shalt crosseth the road", and the Chicken did cross the road, and there was much rejoicing.
My DeviantART profile
My DeviantART profile

-
Taruto!

- Joined: Sat Apr 24, 2004 1:45 pm
- Location: England
- Contact: